

-
Welcome back Guest! Did you know you can mentor other members here at H-M? If not, please check out our Relaunch of Hobby Machinist Mentoring Program!
You are using an out of date browser. It may not display this or other websites correctly.
You should upgrade or use an alternative browser.
You should upgrade or use an alternative browser.
Central machinery 12x36 lathe wiring
- Thread starter Wiscomx78
- Start date
- Joined
- Apr 30, 2015
- Messages
- 11,328
Probably ok, unless they are leaking bug-juice or bulging
Here's your first task: make it look like this. Remove the purple wire and toss it. Change only what's shown here.
Leave all the other wiring in place. You can probably use the long red wires that are on TB-11 and TB-12, just cut them
someplace around midpoint, strip and reconnect as shown in the sketch. You may have enough wire there already.
You can use crimp lugs if you want or not- your choice- don't over-tighten the contactor terminals- they can break
Edit: mistake on sketch, fixed now- wires 1 & 2 from fuse and transformer are existing wires
Last edited:
- Joined
- Apr 30, 2015
- Messages
- 11,328
No, don't power it yet- we have more to do- My fault
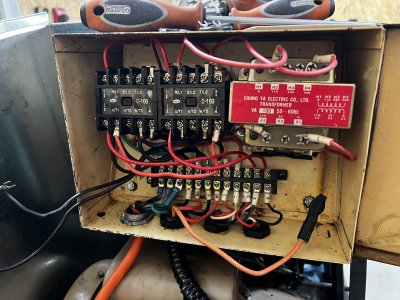
The top contactor rows need work- Might be best to just pull off all the top wires, then I'll do another sketch
There's also some metal jumpers that need to come off for the time being
So do that and then shoot another picture
The top contactor rows need work- Might be best to just pull off all the top wires, then I'll do another sketch
There's also some metal jumpers that need to come off for the time being
So do that and then shoot another picture
- Joined
- Apr 30, 2015
- Messages
- 11,328
I need you to do me a favor:
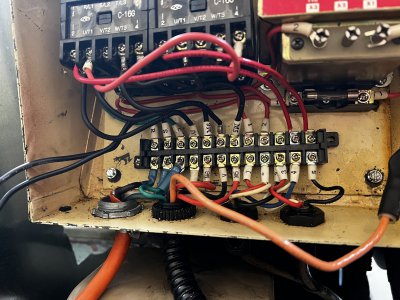
Can you tug on the bottom wires and ID the 3 that I'm not clear on
U, V and M6 from the left contactor bottom row to the terminal strip
I can't quite tell for sure from the pictures- thanks

Can you tug on the bottom wires and ID the 3 that I'm not clear on
U, V and M6 from the left contactor bottom row to the terminal strip
I can't quite tell for sure from the pictures- thanks
- Joined
- Apr 30, 2015
- Messages
- 11,328
It looks like U and M6 are both going to U on the contactor- aren't they?
Thanks for those two pics they are helpful
We are getting close- looking better
Thanks for those two pics they are helpful
We are getting close- looking better
Last edited:
- Joined
- Apr 30, 2015
- Messages
- 11,328
Somebody really made a mess of this thing
I get this mental picture of monkeys with screwdrivers LOL
You can yank that orange wire with the blob of heatshrink tubing on it- or cut it off
Looks like it doesn't do anything- it's just in the way
Also:
1) Pull off the M6 wire, don't need it
2) On the right hand contactor, upper row, move the metal jumper from 1 & R over to
the left hand contactor R & S
Then shoot another pic
I'll post another sketch later today
Last edited:
- Joined
- Apr 30, 2015
- Messages
- 11,328
The final stretch: The stuff from post #32 is still there, I just didn't show it.
Have fun!
Show me before you fire it up so I can catch anything you might have missed

Have fun!
Show me before you fire it up so I can catch anything you might have missed
Last edited: